IIS Shared Configuration allows system administrators to use multiple IIS servers sharing the same configuration file. If you want to keep this configuration file in an Azure file share, there is a specific procedure you need to follow. Step-by-step procedure is in the Solution section below.
You can also try to use “Map network drive” feature in Windows File Explorer or the New-PSDrive command below. In my case, neither of these options provided a permanent solution.
New-PSDrive -Name Z -PSProvider FileSystem -Root "\\name.file.core.windows.net\your-file-share" -Credential $credential -Persist -Scope globalIf you are seeing too many requests from an Azure service in your IIS server, check this post out: IIS receives too many requests from the user-agent Edge+Health+Probe
Step-by-step instructions for using Azure file share in IIS Shared Configuration
Please use the steps below to link your Azure file share to your IIS.
- Go to your Azure dashboard
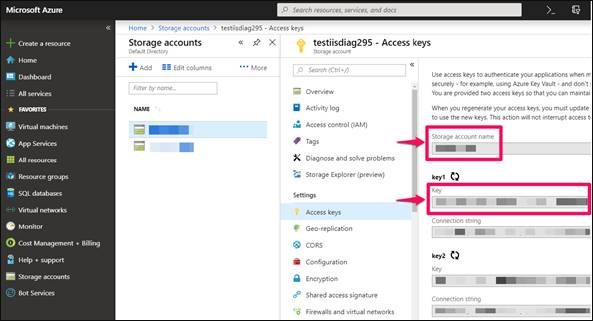
- Click “Storage accounts > name-of-the-storage > Access keys”
- Copy the storage account name and key to notepad
- Login to the web server in which IIS is installed
- Run the command below to create a network share that will be used by IIS Shared Configuration
net use * \\name.file.core.windows.net\your-file-share /User:your-storage-account-name your-key - Create a local user account in “Windows Server (Computer Management > Local Users and Groups > Users > Right click > New User)“
- The user name should be exactly the same as your storage account name
- The password should be exactly the same as your storage account’s key
- Check “User cannot change password” and “Password never expires” options. Click OK
- Add this account to the IIS_IUSRS group (Computer Management > Local Users and Groups > Groups > IIS_IUSRS > Properties > Add)
- The rest of the steps are for setting up IIS Shared Configuration (The article explains it very well)

The main point is that creating a local user account that has the same username and password (key) as your storage account in Azure.
How about using a service account instead of a local account?
I am not aware of a way to use a service account to access Azure file share via IIS. If you are accessing it manually (login to server and go to the path in File Explorer), you can use persistent connections (Another great resource is here). However, if you want IIS to access to the share, using a local account that matches with the Azure storage account seems to be the only way currently.
Alternatives to Azure File Share
I have seen administrators who doesn’t want to change application pool identity to a local account. If you don’t want to change it, there two options:
- If you still want to store your files in Azure File Share, you can set up Azure File Sync as explained here so that files in your Azure File Share are automatically synced to your server. Then you can use these files in your application. You just need to give access to your application pool identity on the sync folder. I have tested it. I was able to display images from Azure File Share. Please note that synced files will occupy some space in your server and sync process will consume bandwidth.
- If using Azure File Share is not mandatory but you need to store them in cloud, you can use Blob Storage. In order to do it, there is a need for a connection string that includes Azure Storage Account username and key. Here is a good tutorial about this.
After configuring your application in Azure, you may run into a connection issue while trying to publish your application in Visual Studio. Check this post out for a solution: (Solved) Could not reach the Web Deploy endpoint on the specified virtual machine

Excelente artículo, muchas gracias me sacó de un apuro.